※ 이 글은 정보 전달의 목적보다는 토비님의 강의를 참고하여 ListenableFuture 을 메소드 체이닝으로 리팩토링하는 과정 기록입니다.
Future vs. ListenableFuture
Future
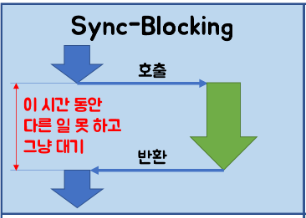
멀티스레드 작업 시 사용하는 ExecutorService 에서 작업 결과를 받거나 기다리기 위해 Future 클래스의 future.get() 메소드를 사용했을 것이다. 하지만 get() 은 작업이 끝날 때 까지 blocking 되어 다음 라인으로 내려가지 못한다는 한계가 있다.
ListenableFuture
하지만 ListenableFuture 은 가능하다! 비동기 프로그래밍 패턴으로 구현되어 있기 때문에 작업스레드! 너 끝나면 이 콜백메소드 실행해! 하고 던져주고 바로 다음으로 넘어가기 때문이다.
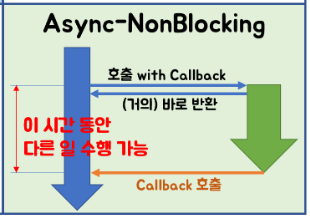
💡 비동기란?
메인 스레드가 작업 스레드한테 작업 끝났는지 일일히 물어보는게 아니라 작업 스레드가 할 일 끝나면 알아서 callback 함수 호출해주는 방식
하지만 이런 단점이…
하지만 콜백 메소드는 A 끝나면 B 실행하고, B 끝나면 C 실행하고 C끝나면 D실행하고.. 의 중첩 구조를 가지기 때문에 코드 가독성이 떨어진다. 그래서 콜백 메소드가 난무하고 있는 구조를 콜백 헬이라고 하며 왼쪽에서 장풍을 쏘고 있는 짤로도 유명하다.
아래에서는 ListenableFuture 로 4개의 콜백 메소드를 만들어볼것이고, 이를 메소드 체이닝을 활용해 가독성을 더 좋게 할 수 있도록 리팩토링 해 볼 것이다.
ListenableFuture 리팩토링하기
준비
ThreadPoolTaskExecutor 생성
ThreadPoolTaskExecutor executor = new ThreadPoolTaskExecutor();
executor.setCorePoolSize(3);
executor.setWaitForTasksToCompleteOnShutdown(true);
executor.initialize();
작업1
1부터 10까지인 IntStream 반환
private static ListenableFuture<IntStream> getListenableFuture1(ThreadPoolTaskExecutor threadPoolTaskExecutor) {
    return threadPoolTaskExecutor.submitListenable(() -> {
        Thread.sleep(100);
        return IntStream.rangeClosed(1, 10);
    });
}
작업2
각 숫자에 10 씩 곱한 IntStream 반환
private static ListenableFuture<IntStream> getListenableFuture2(ThreadPoolTaskExecutor threadPoolTaskExecutor, IntStream s) {
    return threadPoolTaskExecutor.submitListenable(() -> s.map(i -> i * 10));
}
작업3
문자열로 변환해 List<String> 반환
private static ListenableFuture<List<String>> getListenableFuture3(ThreadPoolTaskExecutor threadPoolTaskExecutor, IntStream s2) {
    return threadPoolTaskExecutor.submitListenable(() ->
             s2.boxed()
            .map(i -> "work " + i)
            .collect(Collectors.toList())
    );
}
Callback Hell 코드
log.info("start");
ListenableFuture<IntStream> future1 = getListenableFuture1(executor);
future1.addCallback(s -> {
log.info("service 1 success");
ListenableFuture<IntStream> future2 = getListenableFuture2(executor, s);
future2.addCallback(s2 -> {
log.info("service 2 success");
ListenableFuture<List<String>> future3 = getListenableFuture3(executor, s2);
log.info("service 3 success");
future3.addCallback(s3 -> {
log.info("Finished: {}", s3);
}, e -> log.error(e.getMessage()));
}, e -> log.error(e.getMessage()));
}, e -> log.error(e.getMessage()));
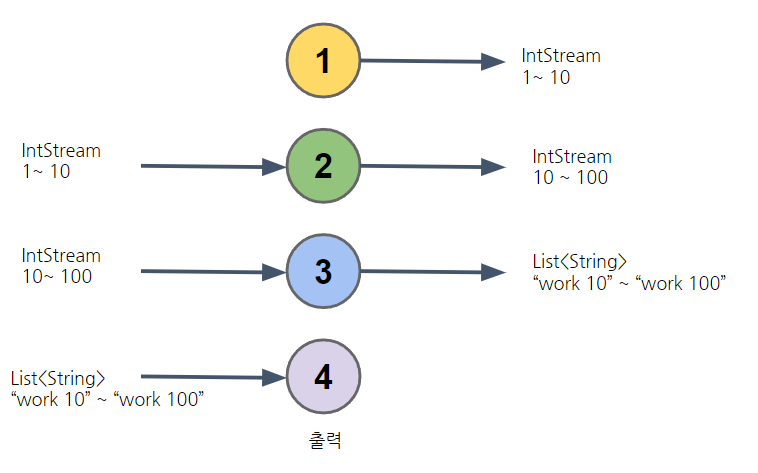
log.info("end");총 4개의 작업이 있다.
- 1부터 10까지인
IntStream반환 - 각 숫자에 10 씩 곱한
IntStream반환 - 문자열로 변환해
List<String>반환 - 출력
워크플로우를 그림으로 나타내면 아래와 같다.
출력문
[main] INFO dev.hyein.reactivesample.CallBackHellCustomizing - start
[main] DEBUG org.springframework.scheduling.concurrent.ThreadPoolTaskExecutor - Initializing ExecutorService
[main] INFO dev.hyein.reactivesample.CallBackHellCustomizing - end
[ThreadPoolTaskExecutor-1] INFO dev.hyein.reactivesample.CallBackHellCustomizing - service 1 success
[ThreadPoolTaskExecutor-2] INFO dev.hyein.reactivesample.CallBackHellCustomizing - service 2 success
[ThreadPoolTaskExecutor-2] INFO dev.hyein.reactivesample.CallBackHellCustomizing - service 3 success
[ThreadPoolTaskExecutor-3] INFO dev.hyein.reactivesample.CallBackHellCustomizing - Finished: [work 10, work 20, work 30, work 40, work 50, work 60, work 70, work 80, work 90, work 100]
[main] DEBUG org.springframework.scheduling.concurrent.ThreadPoolTaskExecutor - Shutting down ExecutorService
start 로그 후에 end 로그가 바로 찍힌 것으로 보아 비동기로 수행된다는 것을 확인할 수 있다.
Callback Hell 장풍 그림 보다는 약하지만 콜백 안의 콜백 안의 콜백을 중첩으로 구현해 해석하기에 꽤 시간이 걸린다.
리팩토링 후
log.info("start");
Completion.from(getListenableFuture1(executor))
                    .andApply(intStream -> getListenableFuture2(executor, (IntStream) intStream))
          .andApply(intStream -> getListenableFuture3(executor, (IntStream) intStream))
          .andAccept(intList -> log.info("Finished: {}", intList));
log.info("end");
Completion 이라는 클래스를 생성했다. 메소드 체이닝으로 구현했기 때문에 조금 더 보기가 간결해졌다. 메소드의 역할은 아래와 같다.
- from(): input 은 없고 ouput 만 있다.
- andApply(): input 과 output 둘 다 있다.
- andAccept(): input 만 있고 output 은 없다.
이 작업은 from() 이 끝날 때까지 기다렸다가 andApply() 가 실행되고, andApply() 이 끝날 떄까지 기다렸다가 다음 andApply() 안 메소드가 실행되고 이런 blocking 방식이 아니다.
작업이 끝나고 다음 작업을 시작하는 트리거는 실제 작업을 해주는 워커 스레드에게 위임하고, Completion은 실행계획서를 만드는 것이었던 것이다.
이제 Completion 구현 로직을 보며 실행계획서를 어떻게 만드는지 확인해보자
Completion.java
@Getter
@Slf4j
public class Completion<T> {

    Completion<T> next;
    Function<T, ListenableFuture<T>> function;
    Consumer<T> consumer;

    public Completion() {}
    public Completion(Function<T, ListenableFuture<T>> function) {
        this.function = function;
    }
    public Completion(Consumer<T> consumer) {
        this.consumer = consumer;
    }

    public static <T> Completion from(ListenableFuture<T> future) {
        Completion<T> completion = new Completion();
        future.addCallback(result -> {
            completion.complete(result);
        }, e -> completion.error(e));
        return completion;
    }

    public void complete(T result) {
        if(next != null) next.run(result);
    }

    public void run(T result) {
        if(isAccept()) {
            consumer.accept(result);
        }
        else if (isApply()) {
            ListenableFuture<T> listenableFuture = function.apply(result);
            listenableFuture.addCallback(result1 -> complete(result1), e -> error(e));
        }
    }

    private boolean isApply() {
        return function != null;
    }

    private boolean isAccept() {
        return consumer != null;
    }

    public void error(Throwable e) {
        log.error(e.getMessage());
    }

    public Completion<T> andApply(Function<T, T> function) {
        Completion<T> completion = new Completion(function);
        this.next = completion;
        return completion;
    }

    public void andAccept(Consumer<T> consumer) {
        Completion<T> completion = new Completion<>(consumer);
        this.next = completion;
    }
}
변수 설명
next: 지금 작업 이후 어떤 작업을 할 지 저장한다.Function/Consumer: 작업의 종류이다.andApply()면 input, output 이 둘 다 필요한Function에,andAccept()면 input 만 필요한Consumer에 저장한다.
함수 설명
from(): 콜백 메소드를 선언하고 바로 종료한다.andApply(): 다음 작업은Function이야 라고 선언하고 바로 종료한다.andAccept(): 다음 작업은Consumer야 라고 선언하고 바로 종료한다.complete():ListenableFuture작업이 끝나면 호출된다.next를 확인하고 다음 작업이 있으면 실행한다.run(): 다음 할 작업이andApply()로부터 온거라면Function을 실행하고,andAccept()로부터 온 거라면Consumer를 실행한다.
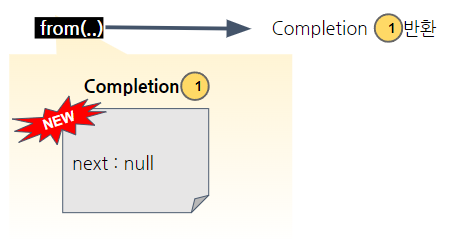
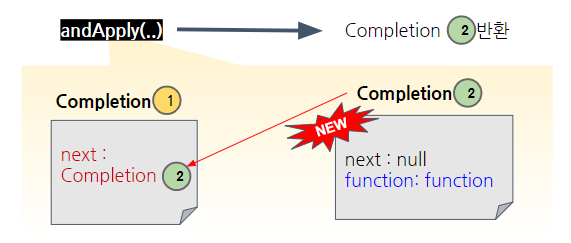
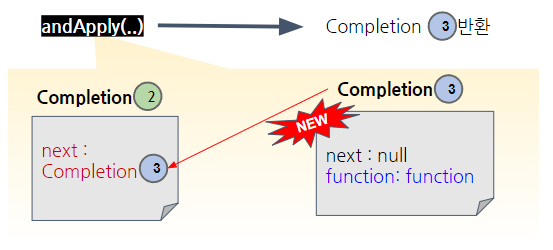
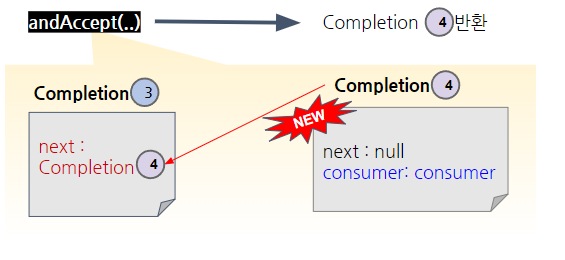
실행 계획서
① from() 에서 1번 Completion 생성 후 반환
② andApply() : 2번 생성 후 1번 의 next 에 2번 설정 후 2번 반환
③ andApply() : 3번 생성 후 2번 의 next 에 3번 설정 후 3번 반환
④ andAccept() : 4번 생성 후 3번 의 next 에 4번 설정 후 4번 반환
진짜 실행
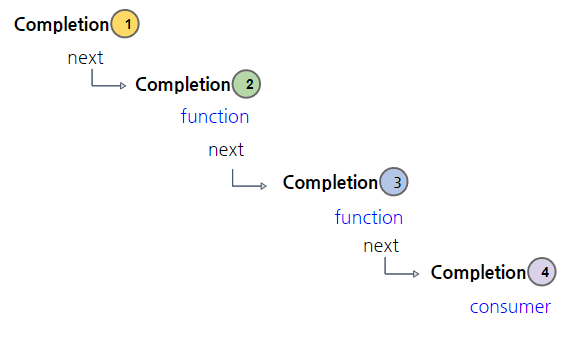
next 를 타고타고 가면서 function 혹은 consumer 를 실행한다.
아쉬운 점
- 에러 처리 메소드도 외부에서
doError()처럼 받을 수 있으면 좋았겠다. - 진짜 실행이 실행계획서 만드는 시점보다 더 빨리 실행되면.. 안 된다. 그래서 작업1에
Thread.sleep()을 넣어주었다.
사실, 이미 구현된 클래스가 있다
CompletableFuture
CompletableFuture
        .supplyAsync(() -> IntStream.rangeClosed(1, 10), executor)
        .thenApply(s -> s.map(i -> i * 10))
        .thenApply(s -> s.boxed().map(i -> "work " + i).collect(Collectors.toList()))
.thenAccept(s -> log.info("Finished: {}", s));supplyAsync: 공급만 할 때thenApply: 받을 인자가 있고 반환할 게 있을 때thenAccept: 받을 인자는 있고 반환할 게 없을 때
레퍼런스
https://www.youtube.com/watch?v=Tb43EyWTSlQ&list=PLOLeoJ50I1kkqC4FuEztT__3xKSfR2fpw&index=7
https://github.com/explooosion/emoji-comment-collection/issues/6
http://homoefficio.github.io/2017/02/19/Blocking-NonBlocking-Synchronous-Asynchronous/
글 읽어주셔서 언제나 감사합니다. 좋은 피드백, 개선 피드백 너무나도 환영합니다.
ListenableFuture 의 Callback Hell 해결하기
'SearchDeveloper > Java' 카테고리의 다른 글
| [Webflux] nested flatMap 지옥 해결하기 (0) | 2025.03.15 |
|---|---|
| [JPA] 영속성 컨텍스트(Persistence Context) : 엔티티 관리 공간 (0) | 2022.10.03 |
| Java 애플리케이션 메모리 누수(Memory leak) 잡기 - jstat, MAT (0) | 2022.10.02 |
| Java 에서 테스트용 도커 컨테이너 띄우는 법 : TestContainer (4) | 2022.06.21 |
| [JAVA] stream 코드 스니펫 (0) | 2021.05.30 |


