Spring REST Docs 는 테스트 코드를 통해 API 명세서 작성을 도와주는 라이브러리이다. 필자는 빌드, 문서 작성 등 restdocs 의 전반적인 이해가 어려워 관련 강의를 들은 지 1년 만에 두 번째 시도 끝에 실무에 적용할 수 있게 되었다. (감격..😭)
먼저 최종 산출물을 확인하고 빌드하는 법, 문서 작성하는 법 순으로 설명해보고자 한다.

기술 스택
- spring boot 2.7.3
- gradle 7.5
- java 11
- JUnit5
① 최종 산출물 - API 명세서 (index.html)
http://127.0.0.1:8080/esonline/docs/index.html

이것이 최종 API 명세서인 index.html 이다. 문서를 파일이나 타 프로그램에서 관리하는 게 아닌 API URL 로 바로 접근할 수 있다는게 장점처럼 느껴졌다.
index.adoc 에서 필자의 입맛대로 문서를 작성하며 테스트가 성공하면 생성되는는 스니펫(snippet:토막) 문서를 index.adoc 에 포함시켜 하나의 완성된 문서를 도출하는 구조이다.
🔍 .adoc ? 그게 뭐야?
♣ asciidoc: 마크업 언어 (≒ markdown)
♣ .adoc: asciidoc 으로 작성된 파일 (≒ .md)
♣ Spring REST Docs: asciidoc를 주 언어로 사용
♣ Asciidoctor: asciidoc를 html 로 변환해주는 컨버터
② index.html 는 어떻게 만들어지는가? : 빌드하기
gradle task 를 실행하면, Asciidoctor가 index.adoc 와 include 된 스니펫 문서들을 합쳐 디폴트 경로인 build/asciidoc 에 html 파일로 변환한다. 하지만 build/asciidoc 에 있다고 해서 누군가 알아줄거라고 생각하면 오산이다. jar 나 war 로 패키징할거라면 resource 디렉토리인 build/resources/main/static/docs 에, 로컬에서 확인하려면 src/main/resources/static/docs 에 그들이 인식할 수 있는 알맞은 위치에 복사해 넣어줘야한다.

구조도를 그리자면 이런 과정을 거친다.

이제 실 구현체인 build.gradle 를 확인해보자!
plugins {
    id 'org.springframework.boot' version '2.7.3'
    id 'io.spring.dependency-management' version '1.0.13.RELEASE'
    id 'java'
    id 'org.asciidoctor.jvm.convert' version '3.3.2'  // [1]
}

group = 'dev.elsboo'
version = '0.0.1-SNAPSHOT'
sourceCompatibility = '11'

configurations {
    compileOnly {
        extendsFrom annotationProcessor
    }
    asciidoctorExt   // [2]
}

repositories {
    mavenCentral()
}

dependencies {
    // spring
    implementation 'org.springframework.boot:spring-boot-starter-data-elasticsearch'
    implementation 'org.springframework.boot:spring-boot-starter-web'
    annotationProcessor 'org.springframework.boot:spring-boot-configuration-processor'

    // lombok
    compileOnly 'org.projectlombok:lombok'
    annotationProcessor 'org.projectlombok:lombok'

    // test
    testImplementation 'org.springframework.boot:spring-boot-starter-test'
    asciidoctorExt 'org.springframework.restdocs:spring-restdocs-asciidoctor' // [3]
    testImplementation group: 'org.springframework.restdocs', name: 'spring-restdocs-mockmvc', version: '2.0.6.RELEASE' // [4]
}

tasks.named('test') {
    useJUnitPlatform()
}

asciidoctor { // [5]
    //inputs.dir snippetsDir
    configurations 'asciidoctorExt' // [6]
    dependsOn test // [7]
}

task copyDocument(type: Copy) { // [8]
    dependsOn asciidoctor // [9]
    from(file("${asciidoctor.outputDir}")) // [10]
    into(file("src/main/resources/static/docs")) // [11]
}

build { // [12]
    dependsOn copyDocument // [13]
}

bootJar { // [14]
    dependsOn asciidoctor  // [15]
    copy {  // [16]
        from "${asciidoctor.outputDir}"  // [17]
        into 'build/resources/main/static/docs'  // [18]
    }
}
다음은 Spring Rest Docs 를 위해 추가한 코드 설명이다.
[1] : asciidoc 언어를 html 로 변환해주는 asciidoctor 플러그인을 추가한다.
[2] : 스니펫 문서를 메인 문서에 보다 간단하게 포함시킬 수 있는 방식을 제공하는 asciidoctorExt 를 선언한다.
[3] : asciidoctorExt 용 디펜던시를 추가한다. 사실 asciidoctorExt 를 사용하지 않아도 동작에는 지장이 없다. 하지만 스니펫 디폴트 경로 등 spring-restdocs 전용으로 사용이 용이하도록 추가해주는 것이다.
[4] : API mock 테스트할 때 asciidoc 문서를 생성해주는 디펜던시를 추가한다.
[5] : asciidoctor task
- [6] : asciidoctorExt 사용을 선언한다.
- [7] : asciidoctor task 실행 전에 test task 를 먼저 실행해 스니펫 문서를 미리 만들어둔다.
[8] : copyDocument task - html 복사 해주는 task
- [9] : copyDocument task 실행 전에 asciidoctor task 를 먼저 실행해 html 문서를 만들어둔다.
- [10] 소스 & [11] 타깃 - asciidoctor는 html 파일을 디폴트 output 경로인
${asciidoctor.outputDir}에 생성한다. 이 파일을 로컬에서 실행 시http:localhost:8080/docs/index.html로 접근할 수 있도록 html 파일을 복사한다. ${asciidoctor.outputDir}의 디폴트 경로는 필자같은 경우는build\docs\asciidoc이다. 공식 문서와 경로가 다르니 각자 확인해보자

[12] : build task
- [13] : build task 실행 전에 copyDocument task 를 먼저 실행해 원하는 위치에 html 문서를 복사한다.
[14] : bootJar task
- [15]: bootJar task 실행 전에 asciidoctor task 를 먼저 실행해 원하는 위치에 html 문서를 만들어둔다.
- [16]: jar 만들 때 html 도 resources 에 포함될 수 있도록 인식 가능한 경로에 html 문서를 복사한다.
- [17] 소스 & [18] 타깃 - asciidoctor 가 생성해준
{asciidoctor.outputDir}의 html 를 jar 의 리소스로 엮일 수 있도록build/resources/main/static/docs로 html 파일을 복사한다.

③ 스니펫 코드를 만들어보자

build 에서 보았던 generated-snippets 을 기억할 것 이다. 이들은 테스트 코드를 실행하면서 나온 산출물이다.
테스트 코드를 살펴보자
@Test
    public void analyzer() throws Exception {
        NoriAnalyzerRequestVo noriAnalyzerRequestVo = createVo();

        mockMvc.perform(
                MockMvcRequestBuilders.get("/analyze/nori")
                        .header(HttpHeaders.ACCEPT, MediaType.APPLICATION_JSON)
                        .param("decompoundMode", "compound")
                        .param("userDictionaryRules", "가곡역 가곡 역")
                        .param("discardPunctuation", "true")
                        .param("noriPartOfSpeech", "NN")
                        .param("inputText", "아버지가 가방에 들어가고 싶다.")
        )
                .andDo(MockMvcResultHandlers.print())
                .andExpect(MockMvcResultMatchers.status().isOk())
                                .andExpect(MockMvcResultMatchers.jsonPath("$.analyzedTextInfoList", Matchers.hasSize(Matchers.not(0))))

                .andDo(document("analyze-nori",
                        requestHeaders(
                                headerWithName(HttpHeaders.ACCEPT).description("accept header")
                        ),

                        requestParameters(
                                parameterWithName("decompoundMode").description("복합 명사 옵션").attributes(
                                        key("available").value("none,discard,mixed")
                                ),
                                parameterWithName("userDictionaryRules").description("유저 사전").optional(),
                                parameterWithName("discardPunctuation").description("기호 제거 여부"),
                                parameterWithName("noriPartOfSpeech").description("stop tags").attributes(
                                        key("available").value("E,IC,J,MAG,MM,NA,NR,SC,SE,SF,SH,SL")
                                ),
                                parameterWithName("inputText").description("입력 텍스트").optional()
                        ),

                        responseFields(
                                fieldWithPath("analyzedTextInfoList[0].analyzedText").description("분석 완료된 텍스트"),
                                fieldWithPath("analyzedTextInfoList[0].startOffset").description("텀 시작 위치"),
                                fieldWithPath("analyzedTextInfoList[0].endOffset").description("텀 끝 위치")
                        )

                ))
        ;
    }
이 중 스니펫 코드 생성은 아래 부분이다. 제공하는 다양한 스니펫 중 request-headers, request-parameters, response-fields 를 생성하고 있다.
.andDo(
                document( // [1]
                                                "analyze-nori",  // [2]
                                                // request-headers.adoc
                        requestHeaders( // [3]
                                headerWithName(HttpHeaders.ACCEPT).description("accept header") // [4]
                        ),
                                                // request-parameters.adoc
                        requestParameters( // [5]
                                parameterWithName("decompoundMode").description("복합 명사 옵션").attributes(
                                        key("available").value("none,discard,mixed") // [6]
                                ),
                                parameterWithName("userDictionaryRules").description("유저 사전").optional(),
                                parameterWithName("discardPunctuation").description("기호 제거 여부"),
                                parameterWithName("noriPartOfSpeech").description("stop tags").attributes(
                                        key("available").value("E,IC,J,MAG,MM,NAL")
                                ),
                                parameterWithName("inputText").description("입력 텍스트").optional()
                        ),
                                                // response-fields.adoc
                        responseFields( // [7]
                                fieldWithPath("analyzedTextInfoList[0].analyzedText").description("분석 완료된 텍스트"), // [8]
                                fieldWithPath("analyzedTextInfoList[0].startOffset").description("텀 시작 위치"),
                                fieldWithPath("analyzedTextInfoList[0].endOffset").description("텀 끝 위치")
                        )

                ))
[1]: 스니펫 생성 메소드
[2]: 스니펫 디렉토리명 지정. build\generated-snippets\analyze-nori 하위에 스니펫이 생성된다.
[3]: request-headers.adoc 생성 부분
- [4]: 테이블에 들어갈 데이터 생성
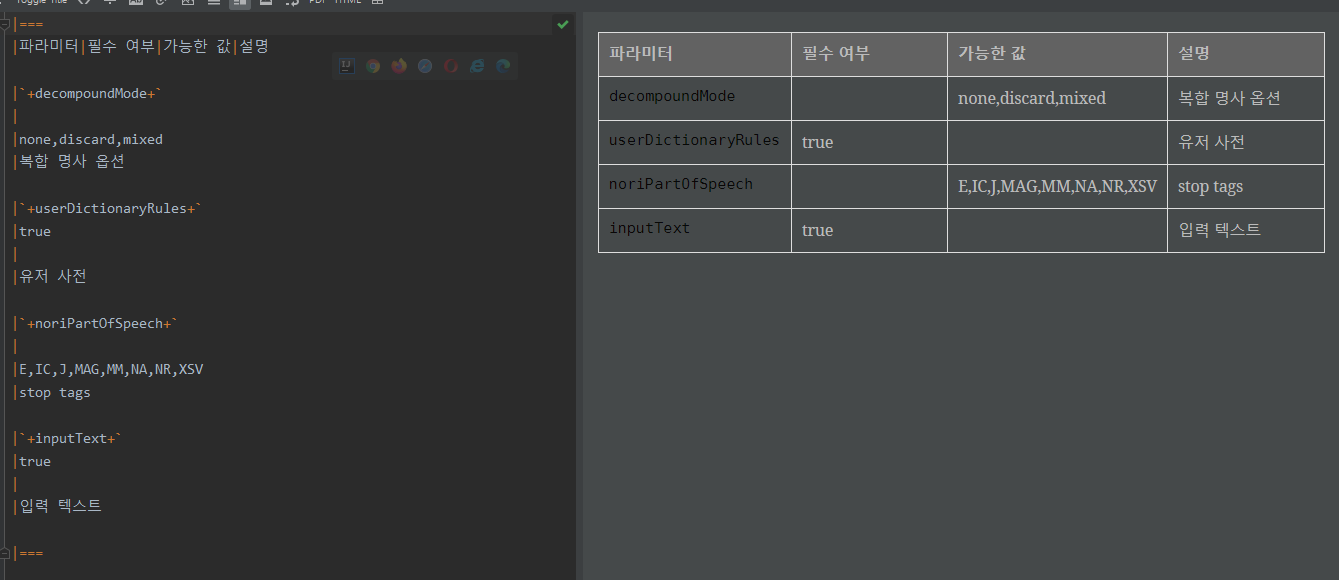
[5]: request-parameters.adoc 생성 부분
- [6]: 추가로 설명할 데이터를 넣어줄 때 attribute() 로 지정한다.
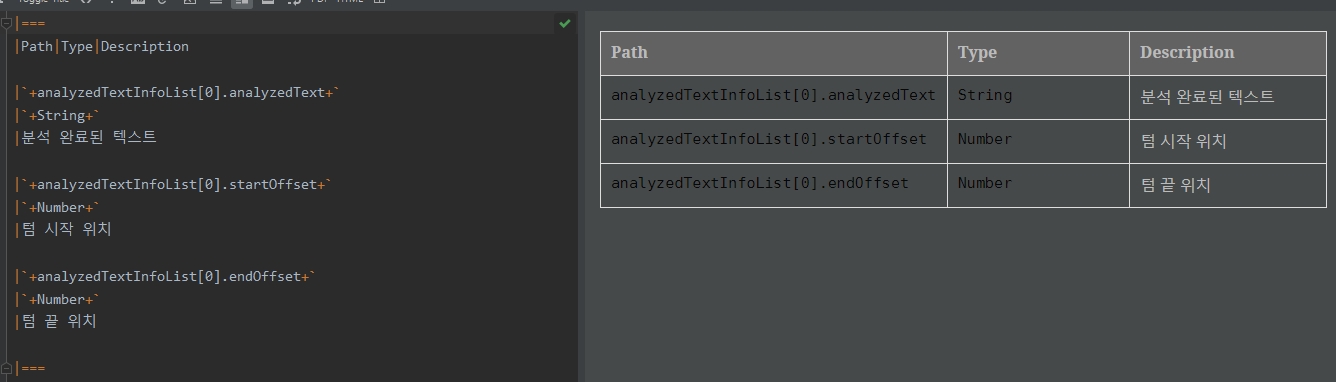
[7]: response-fields.adoc 생성 부분
- [8]: analyzedTextInfoList 는 List 이므로 첫 번째 요소로 문서를 가져온다. 만약 리스트 결과가 없으면 익셉션을 뱉으므로
.andExpect()로 리스트 결과가 존재함을 확인해주는 것이 좋다.
생성된 산출물을 확인해보자

기본적으로 생성되는 6개의 스니펫을 제외하고 테스트 코드로 작성된 3개의 스니펫이 추가로 생성되었다.

테이블을 커스터마이징했기 때문에 기본 모양새와 다르다.
💡 필자가 헷갈렸던 스니펫 차이
request-parameter vs. request-fields?
● request-fields : 요청 body 에 들어가는 필드
● request-parameter: URL 에 들어가는 파라미터
response-fields vs. response-body ?
● response-fields : 산출물이 파라미터 설명 테이블
●response-body: 산출물이 body 내용
스니펫 커스터마이징
그런데 스니펫 테이블이 맘에 안 든다. 이 스니펫 템플릿을 커스터마이징하려면 어떻게 할까?
공식 문서(Customizing the Output) 에 방법이 나와 있다.
- 디폴트 템플릿 을 참고하여 .snippet 파일을 커스터마이징하고
- 파일 경로는
src/test/resources/org/springframework/restdocs/templates/asciidoctor에 위치한 후 - 테스트 코드에서
.attribute()를 통해 값을 넣어주면 된다
💡 .snippet 파일?
스니펫 문서의 형태를 묘사하며 mustache 와 asciidoctor 의 조합이다. 테스트 코드에 작성한 속성값은 mustache 로 제어하고 테이블 등 문서 형태는 asciidoctor로 제어한다.
④ 메인 문서 index.adoc 을 만들어보자
문서 위치

index.adoc 은 src/docs/asciidoc/ 에 두었다. 디폴트 소스 경로이기 때문이다.

그리고 이 글에서는 편의를 위해 메인 .adoc 파일명을 index 라고 했지만 이름은 변경해도 무방하다!
메인 문서 코드를 살펴보자
index.adoc
= ElasticSearch Analyzer Test Online API Guide
서혜인 <catsarah3333@gmail.com>
:sectnums:
:doctype: book
:source-highlighter: rouge
:toc: left
:toclevels: 5
:sectlinks:
:sectanchors:
:operation-request-parameters-title: Request Parameter
:operation-response-fields-title: Response Parameter
:operation-http-request-title: Example Request
:operation-http-response-title: Example Response

[[api]]
= API Reference

[[analyzer]]
== /analyzer

Return *analyzed text* by *input analyzer*. +
지정한 형태소 분석기에 따른 분석 결과를 반환한다.

[[analzer-nori]]
=== /analyzer/nori

`GET` 요청을 사용하여 노리 형태소 분석 결과를 반환한다.

operation::analyze-nori[snippets='http-request,http-response,request-parameters,response-fields']
내가 만들고 싶은 API 명세서를 마크다운 작성하듯이 asciidoc 으로 작성하면된다. 신택스는 마크다운과 어느 정도 비슷하고 index.adoc 에 있는 마크다운과의 차이점만 설명해놓겠다.
https://docs.asciidoctor.org/asciidoc/latest/syntax-quick-reference/
=, ==, === 헤더 지정. 마크다운의 #, ##, ## 와 같다.
:sectnums: 테이블 목차에 번호 뎁스 표시:doctype: book 문서 구조 지정:source-highlighter: rouge 소스 코드 하이라이팅:toc: left Table Of Contents. 테이블 목차 생성 위치 지정:toclevels: 5 테이블 목차 몇 뎁스까지 보여줄건지 지정:sectlinks: 앵커 기능 지원:sectanchors: 헤더에 마우스 hovering 시 앵커 아이콘 생김:operation-request-parameters-title: Request Parameter 스니펫 제목 변경
[[api]] 앵커 URL명
스니펫 문서 포함시키기
그리고 주목할 부분은 이 부분이다.
operation::analyze-nori[snippets='http-request,http-response,request-parameters,response-fields']operation 커맨드는 스니펫 문서를 include 하는 역할이다. operation 에 대한 설명이 asciidoc 문서를 뒤져봐도 없는 이유는 build.gradle에서 정의한 asciidoctorExt 가 제공하는 기능이기 때문이다!
asciidoctorExt 는 다음과 같은 장점이 있다.
- 스니펫 문서 생성 경로를 디폴트로
/build/generated-snippets로 지정해준다. - 스니펫 제목을 디폴트로 지정해준다.
만약 asciidoctorExt 를 사용하지 않는다면 스니펫을 include 할 때
ifndef::snippets[]
:snippets: ./build/generated-snippets
endif::[]

include::{snippets}/analyze-nori/request-parameters.adoc[]
include::{snippets}/analyze-nori/response-fields.adoc[]
include::{snippets}/analyze-nori/http-request.adoc[]
include::{snippets}/analyze-nori/http-response.adoc[]
이런 식으로 스니펫 경로를 직접 지정해줘야하며

타이틀도 수동으로 지정해줘야한다.
느낀점
◆ 스니펫에 쓰일 API 정보는 비즈니스 코드에서 읽어오는게 아니라 실행하는 테스트에서 가져온다. 그러므로 검증할 request parameter 는 전부 테스트 코드에 명시되어야한다. (테스트 코드에 없는 request parameter 는 스니펫 문서에도 노출되지 않는단 뜻이다!)
◆ 다만, 응답 데이터에 대해서는 동기화가 깨졌는지 여부를 알 수 있다. response 엔 존재하나 스니펫 코드로 설명이 없거나, 그 반대인 경우도 테스트가 실패하기 때문이다.
◆ 문서가 정교해질수록 spring rest docs 를 쓰든 swagger를 쓰든 문서 코드 작성량은 많아질 수 밖에 없다. 문서 작성 부분이 테스트 안이냐, 비즈니스 로직 안이냐의 차이이다.
◆ 그렇기 때문에 가독성이나 유지보수 측면에서는 spring rest docs 가 괜찮다고 생각한다. 비즈니스 코드와 분리되어 있기 때문에 복잡해 보이지 않고 코드 수정 시에도 swagger 에 비해 큰 영향을 받지 않기 때문이다.
◆ swagger에 비해 restdocs는 문서 작성 느낌이 강하고 수정 자유도가 높다. 스니펫 테이블도 컬럼 추가나 수정이 가능하고 변경이력 같은 부분도 자유자재로 작성할 수 있다.
◆ 하지만 스니펫 템플릿을 수정할 땐 mustache 랑 asciidoc 섞어서 사용하기 때문에 처음 작성하는 경우 신택스 찾아보는게 귀찮다..
단순 문서 작성이나 swagger 보다 러닝커브가 높긴 하다. 하지만 API 명세서와 API 를 한 곳에서 관리한다는 점, 문서 작성 코드와 비즈니스 코드가 분리된다는 점, 특히 API 요청/응답 부분은 스니펫 문서 생성 전 검증을 해주기 때문에 동기화 가능한 점 덕분에 사용할 가치가 있구나 라고 느꼈다.
레퍼런스
https://velog.io/@max9106/Spring-Spring-rest-docs를-이용한-문서화
https://godekdls.github.io/Spring%20REST%20Docs/customizingrequestsandresponses/
https://techblog.woowahan.com/2597/
https://realforceman.tistory.com/70
https://docs.spring.io/spring-restdocs/docs/2.0.5.RELEASE/reference/html5/#introduction
https://docs.asciidoctor.org/asciidoc/latest/
https://jaehun2841.github.io/2019/08/04/2019-08-04-spring-rest-docs/#코드-설명
Spring REST Docs 이해
글 읽어주셔서 언제나 감사합니다. 좋은 피드백, 개선 피드백 너무나도 환영합니다.
'SearchDeveloper > SpringBoot' 카테고리의 다른 글
| [JPA] Multi Datasource 설정하기 (1) | 2022.11.06 |
|---|---|
| [JPA] Querydsl 시작하기 (0) | 2022.10.21 |
| [JPA] Querydsl 에서 Fetch Join 적용 안되는 이유 (3) | 2022.10.12 |
| 스프링부트 jar 구성 및 실행 원리 (4) | 2022.09.08 |
| Spring Data Mongo save 시 DuplicateKeyException 나는 이유 및 해결 (0) | 2022.08.09 |


